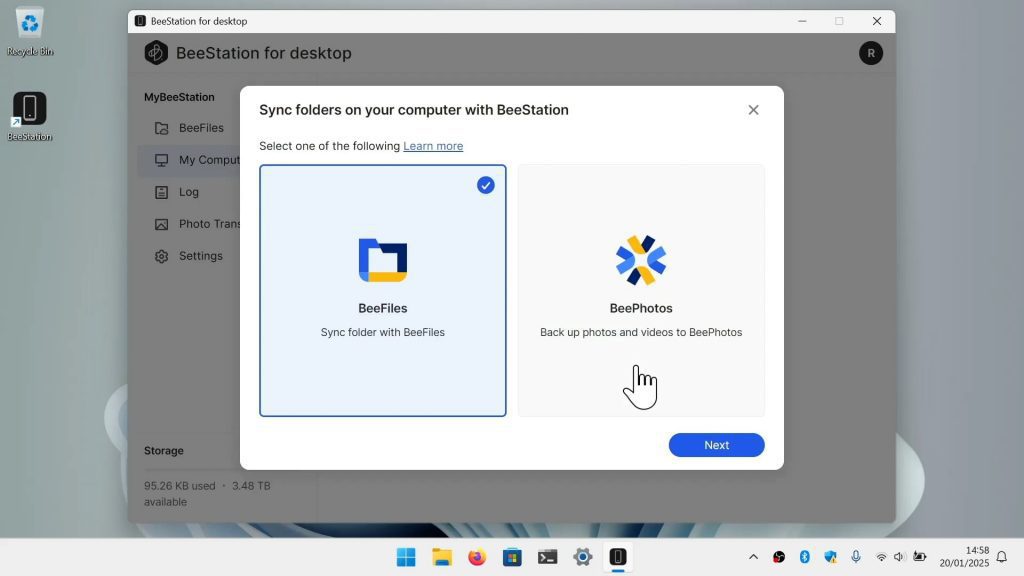


One of the main reasons for owning a BeeStation, is to have a personal cloud that you can use to store your photographs and family videos. So we’re going to take a look at how you setup and use the BeePhotos web portal and smartphone app.
Note: As your BeeStation is acting as personal cloud storage. BeePhotos can be used to either upload, download or manage photographs and videos from a web interface that you host. Alternatively it can also act as a cloud based backup and syncing tool for your smartphone or tablet.
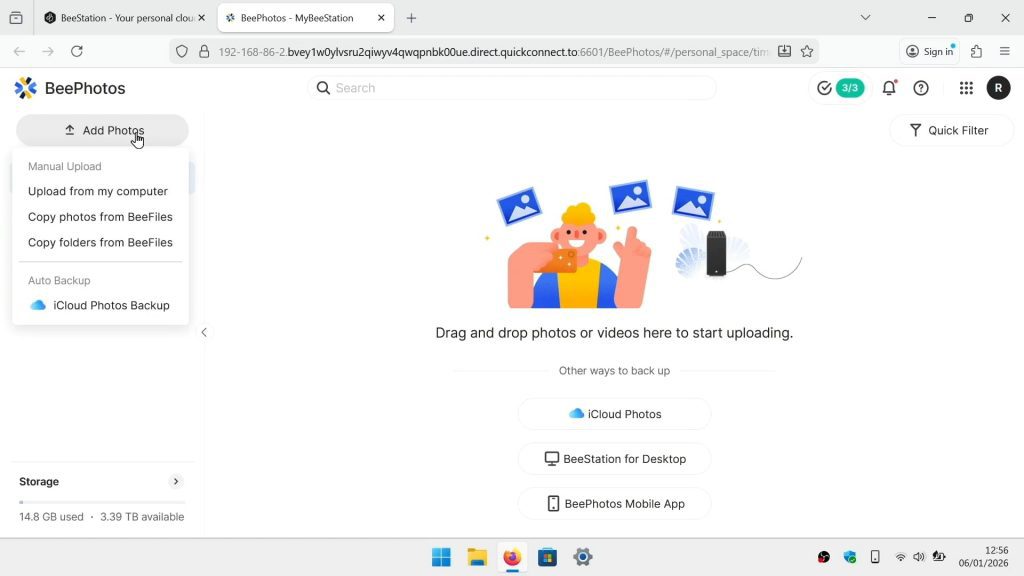
Note: By simply dragging and dropping files from your computer into the BeePhotos portal page. You can upload videos and photos into BeePhotos. Alternatively if you have videos or photos stored in network shares on your BeeStation. You can transfer those files to BeePhotos as follows:
- Open the BeePhotos web portal.
- In the sidebar on the left, you will see the option Add Photos.
- When you select it you will be presented with three options.
- Select one of these options, depending on where you are looking to upload files from.
Note: The first option will allow you to upload files from your computer. With the other options allowing you to copy files or folders from locations on your BeeStation.
Note: Modern smartphone and tablets, use the newer HEIC file format which is not supported on your BeeStation. So video and photos taken using HEIC will need to be converted to the older jpeg format in order for BeePhotos to display previews or thumbnails.
So Synology provides a web browser plugin and Synology Image Assistant. As a way for computers to convert HEIC files and create previews and thumbnails for BeePhotos to use. Unfortunately, at the time of posting I was not able to get this to work. So reverted to using Synology Image Assistant on my smartphone instead.
- From within the BeePhotos app on your phone. Select a photograph that does not have a thumbnail.
- When prompted, enable Viewing photo formats like HEIC.
- Any missing thumbnails should now get automatically generated for the app.
- Then next time you sync your phone with BeePhotos, BeePhotos will also see the thumbnails.
Note: When you use the Beephotos app for the first time. You will be prompted to enable Photo Backup. However if you chose Not Now, you can enable Photo Backup by doing the following:
- From within the BeePhotos app, select the More icon.
- Now enable Photo Backup.
- With backup enabled you will be presented with Backup rules and Upload Settings.
- For Backup rules we like to use Scan and backup all photos.
- Then for Upload settings, we use Wi-Fi only and leave Photos Only disabled.
Note: We use the WiFi only for Upload setting, because we only have a limited data plan on our smartphone. However if we had an unlimited data plan, we would disable WiFi only, so that as we took photos they would be automatically backed up to our BeeStation. By leaving Photos Only disabled, any video footage we take will also get uploaded to our BeeStation. However, be aware that video files have larger file sizes so will take longer to upload.
- From within the BeePhoto web portal locate and choose Add Photos.
- Choose one of three options.
Note: Upload from my computer will allow you to upload any photographs or videos stored on your computer. By default when you choose this option it will start by looking in the Pictures folder of your computers user profile.
Copy photos from BeeFiles, will allow you to copy files to BeePhotos, that are stored on other locations on your BeeStation.
Copy folder from BeeFiles, will allow you to copy whole folders of contents to BeePhotos, that are stored on other locations on your BeeStation.
- From within the BeePhotos web portal, or the BeePhotos smartphone app locate and select Albums.
- By default you will see a number of already created albums that you can use straight away.
- However if you click on the Create Album icon. You will be presented with two options for creating albums
Note: This is the manual method for creating an album. In that it will be up to you to select which photos or videos should be included in the album.
- After choosing “Select photos to create albums“. You will be prompted to select any photos or videos that you want to include in your new album.
- When you click on Create Album, you will be prompted to give that album a name.
- Finally by clicking the back button you will be returned to Albums.
Note: This is the automated way to create an album. In that it uses specific conditions like location, date or meta tags to define what should be automatically included in an album.
- After choosing “Set conditions to create albums“. You will be show a panel asking you to set the conditions you wish your album to use.
- First giving the album a name.
- Next choose if you want just photos or video in your album.
- If needed you can then set to include any photos or videos that were taken within a specific time period.
- Finally you can use specific conditions to narrow down what will be included in your album.
Note: Conditions can include specific meta data like names, geolocations or tags. However, if you want to use for example tags. Those tags will have to already be present within a specific file. This can be done by editing a photo or videos meta data in BeePhotos.
- Simply click on the thumbnail for an image to view that image.
- If you view an image through the BeePhotos web portal, when you move the mouse a pop-up tool bar will appear.
- In the BeePhotos app, the various icons for manipulating an image will be displayed at the top and bottom of the screen.
- After loading an image click on the Create Share Link icon.
- A panel will appear that displays two options.
- By enabling Share publicly a Copy Link button will appear.
- Clicking on the Copy Link button will allow you to paste a link to your photo in an email or messaging app.
Note: While you will need the address for any photos you share. The link that is created will be open for anyone on the internet to access. So we recommend that you use Link Protection.
- Click on Link Protection.
- Another panel will open that allows you to set a password for your Link and if needed, set an expiration date for the share.
- Clicking on the Zoom button will display a slider, that allows to to set the percentage of zoom to use on your photo.
- If you are using the BeePhotos app, you do not have a Zoom button as you use the pinch gesture to zoom in and out.
Note: The information button will display the meta data for the file. This data includes the ability for you to give the file a description, see the date and time when an image was created. The photo or videos file name, its dimensions along with its size. It’s Geolocation data. The device used to take the photo or video, and Tags which can be used to help you create conditional albums.
By clicking on the more tab, you can see technical information such as the aperture, lens used, focal length, exposure time and camera.
Note: As the name suggests Delete will delete a photos or video from BeePhotos. However, you can recover the file either from a backup, or by using the Recycle bin.
Note: The More Options icon will allow you to download a photo or video to your computer. Add the image to an Album, rotate the image, and help tag people for your BeeStations facial ID. The generate a preview function is for generating thumbnails and previews for HEIC files. However as we do not have Synology Image Assistant installed on our computer. This feature does not work.
Notes: Clicking on Sharing will display three tabbed options Shared With Me, Shared With Others and Photo Request. The Shared With Me and Shared With Others options simply allow you to see the shares you have on your BeeStation. Which is useful to help with managing shared links.
The Photo Request option will allow you to create a link to your BeeStation which others can then use to upload video and photo files. So this is an option you would use in order to gather together photos from a special event like a wedding.
- Click on Shared, and choose Photo Request.
- When the panel opens, under Subject give the request a title. You also have an option to add a photo request message.
- If needed select Add photos to album. This option will automatically place any photos received by the request into an album in BeePhotos.
- Using Link Protection to set a maximum size for each file and a date when the link to the photo request will expire.
- When you create your request you can copy the link and paste it into an email or message. The recipient will then use the link to open a webpage that will allow them to upload files to your BeeStation.
Note: If you accidentally delete a file. As long as the files was deleted within 30 days, that file can be recoverable from the BeeFiles Recycle Bin.
- In BeePhotos click on Recycle Bin.
- BeeFiles will open.
- In Recycle Bin you should see the files that was deleted.
- Highlight the file you wish to restore.
- Use the Recover icon to restore your photo or video back to BeePhotos.
Note: If the file uses HEIC, the preview and thumbnail will not be viewable. However, you can use the Generate a Preview option in More Options if you have installed Synology Image Assistant on your computer, or by opening the file in the BeePhotos app on your smartphone.
Notes: As video and photo files can be large. You need to keep an eye on the storage of your BeeStation. In the BeePhotos web portal if you place the mouse pointer on Storage which is in the panel in the bottom left corner of the screen. You will get a breakdown of the Total Storage Capacity of your BeeStation.
In the BeePhotos app, you can see the Total Storage Capacity of your BeeStation by tapping the More icon.
- Mydoodads article | Synology BeeStation | backup and restore.
- Mydoodads article | Synology BeeStation | Install BeeStation for Desktop on Windows.
- Mydoodads article | Synology BeeStation | Install BeeStation for Desktop on macOS.
- Google Store | BeePhotos app.
- Apple Store | BeePhotos app.
- Synology Article | BeePhotos Mobile App Quick Start Guide.